


174
社区成员
 发帖
发帖 与我相关
与我相关 我的任务
我的任务
 分享
分享
Course for This Assignment |
2024_MU_SE_EE308 |
| Student ID | 832201203 |
| Assignment Requirements | Design a front-end and back-end separated contact |
| Objectives of This Assignment | Learn basic development techniques for front and back ends |
My project relies on the front-end set up by html and css, the database set up by MySQL, and the back-end set up by pycharm django to realize the function of data input to the front-end, and then the front-end can exchange information with the back-end and database.
| Link | Extract code |
| https://pan.baidu.com/s/1xEadOVSJeP0BY2TcJFYMPg?pwd=5678 | 5678 |
Programming contacts |
Planned time |
Actual time |
| Learn online courses | 900 mins | 960 mins |
| Front-end design | 240 mins | 270 mins |
| Back-end design | 240 mins | 250 mins |
| Front end and back end connection | 120 mins | 160 mins |
| Total | 1500 mins | 1640 mins |
You can get the app at the following link:http://127.0.0.1:8000/info/enter/.
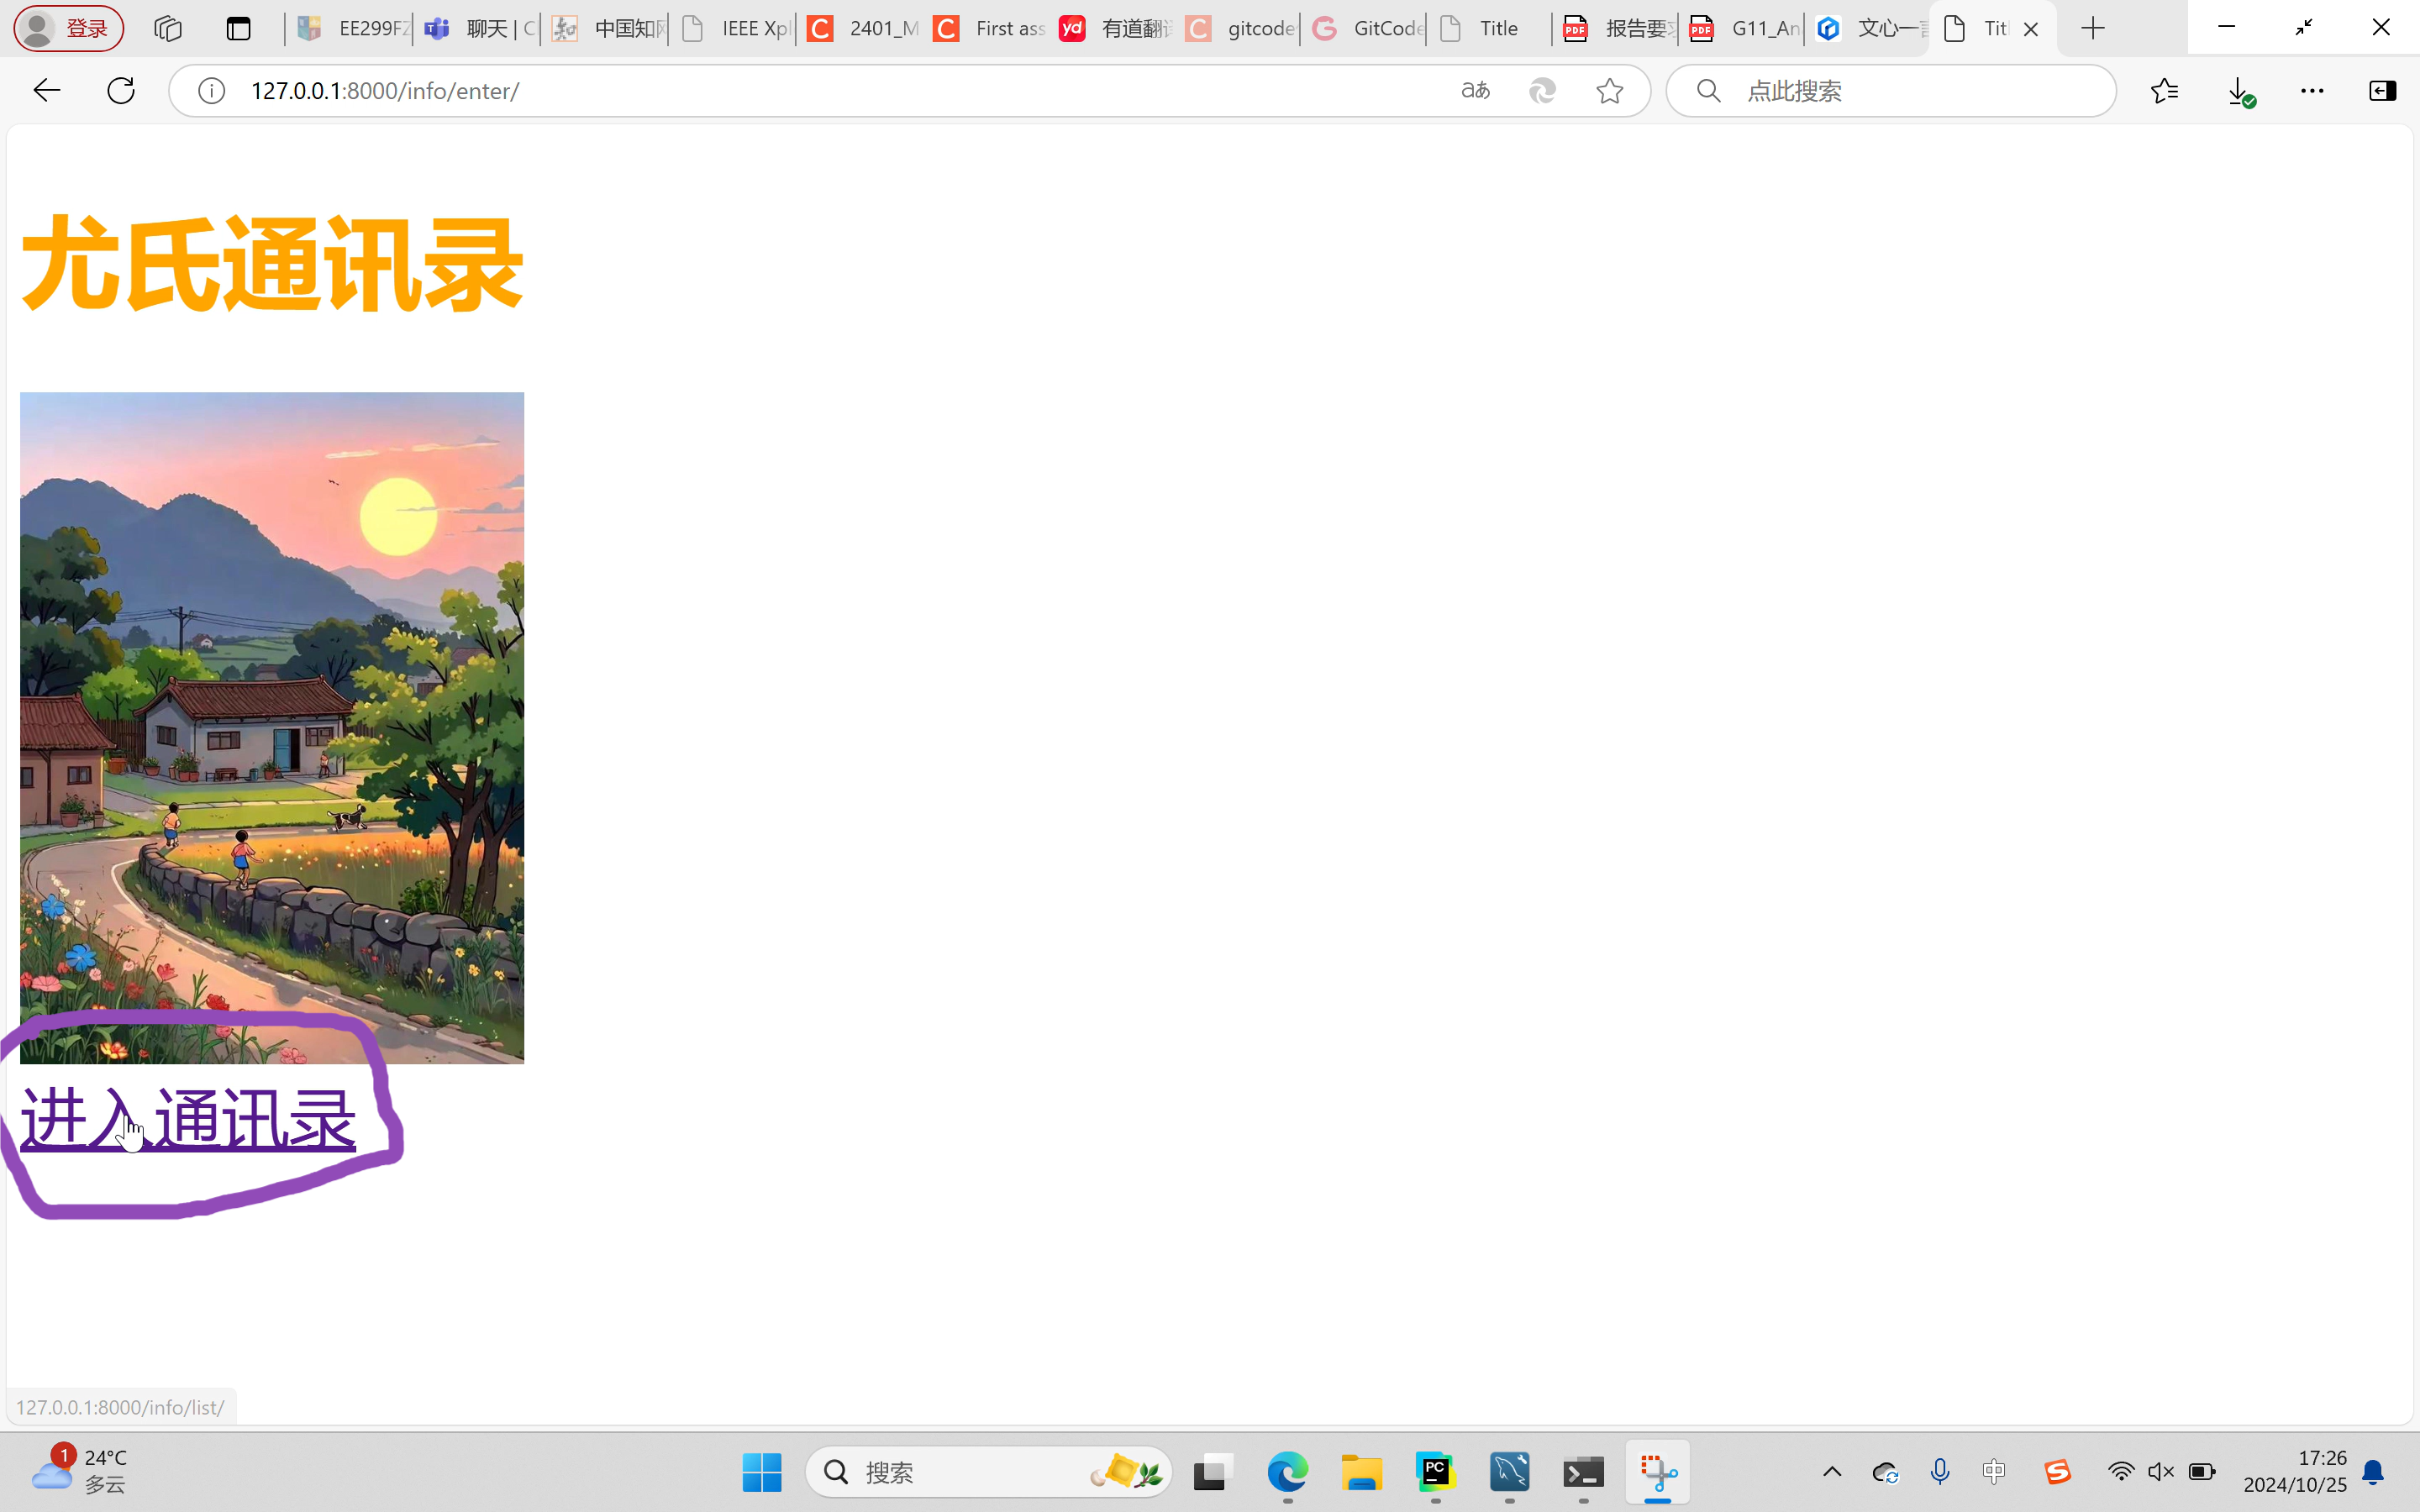

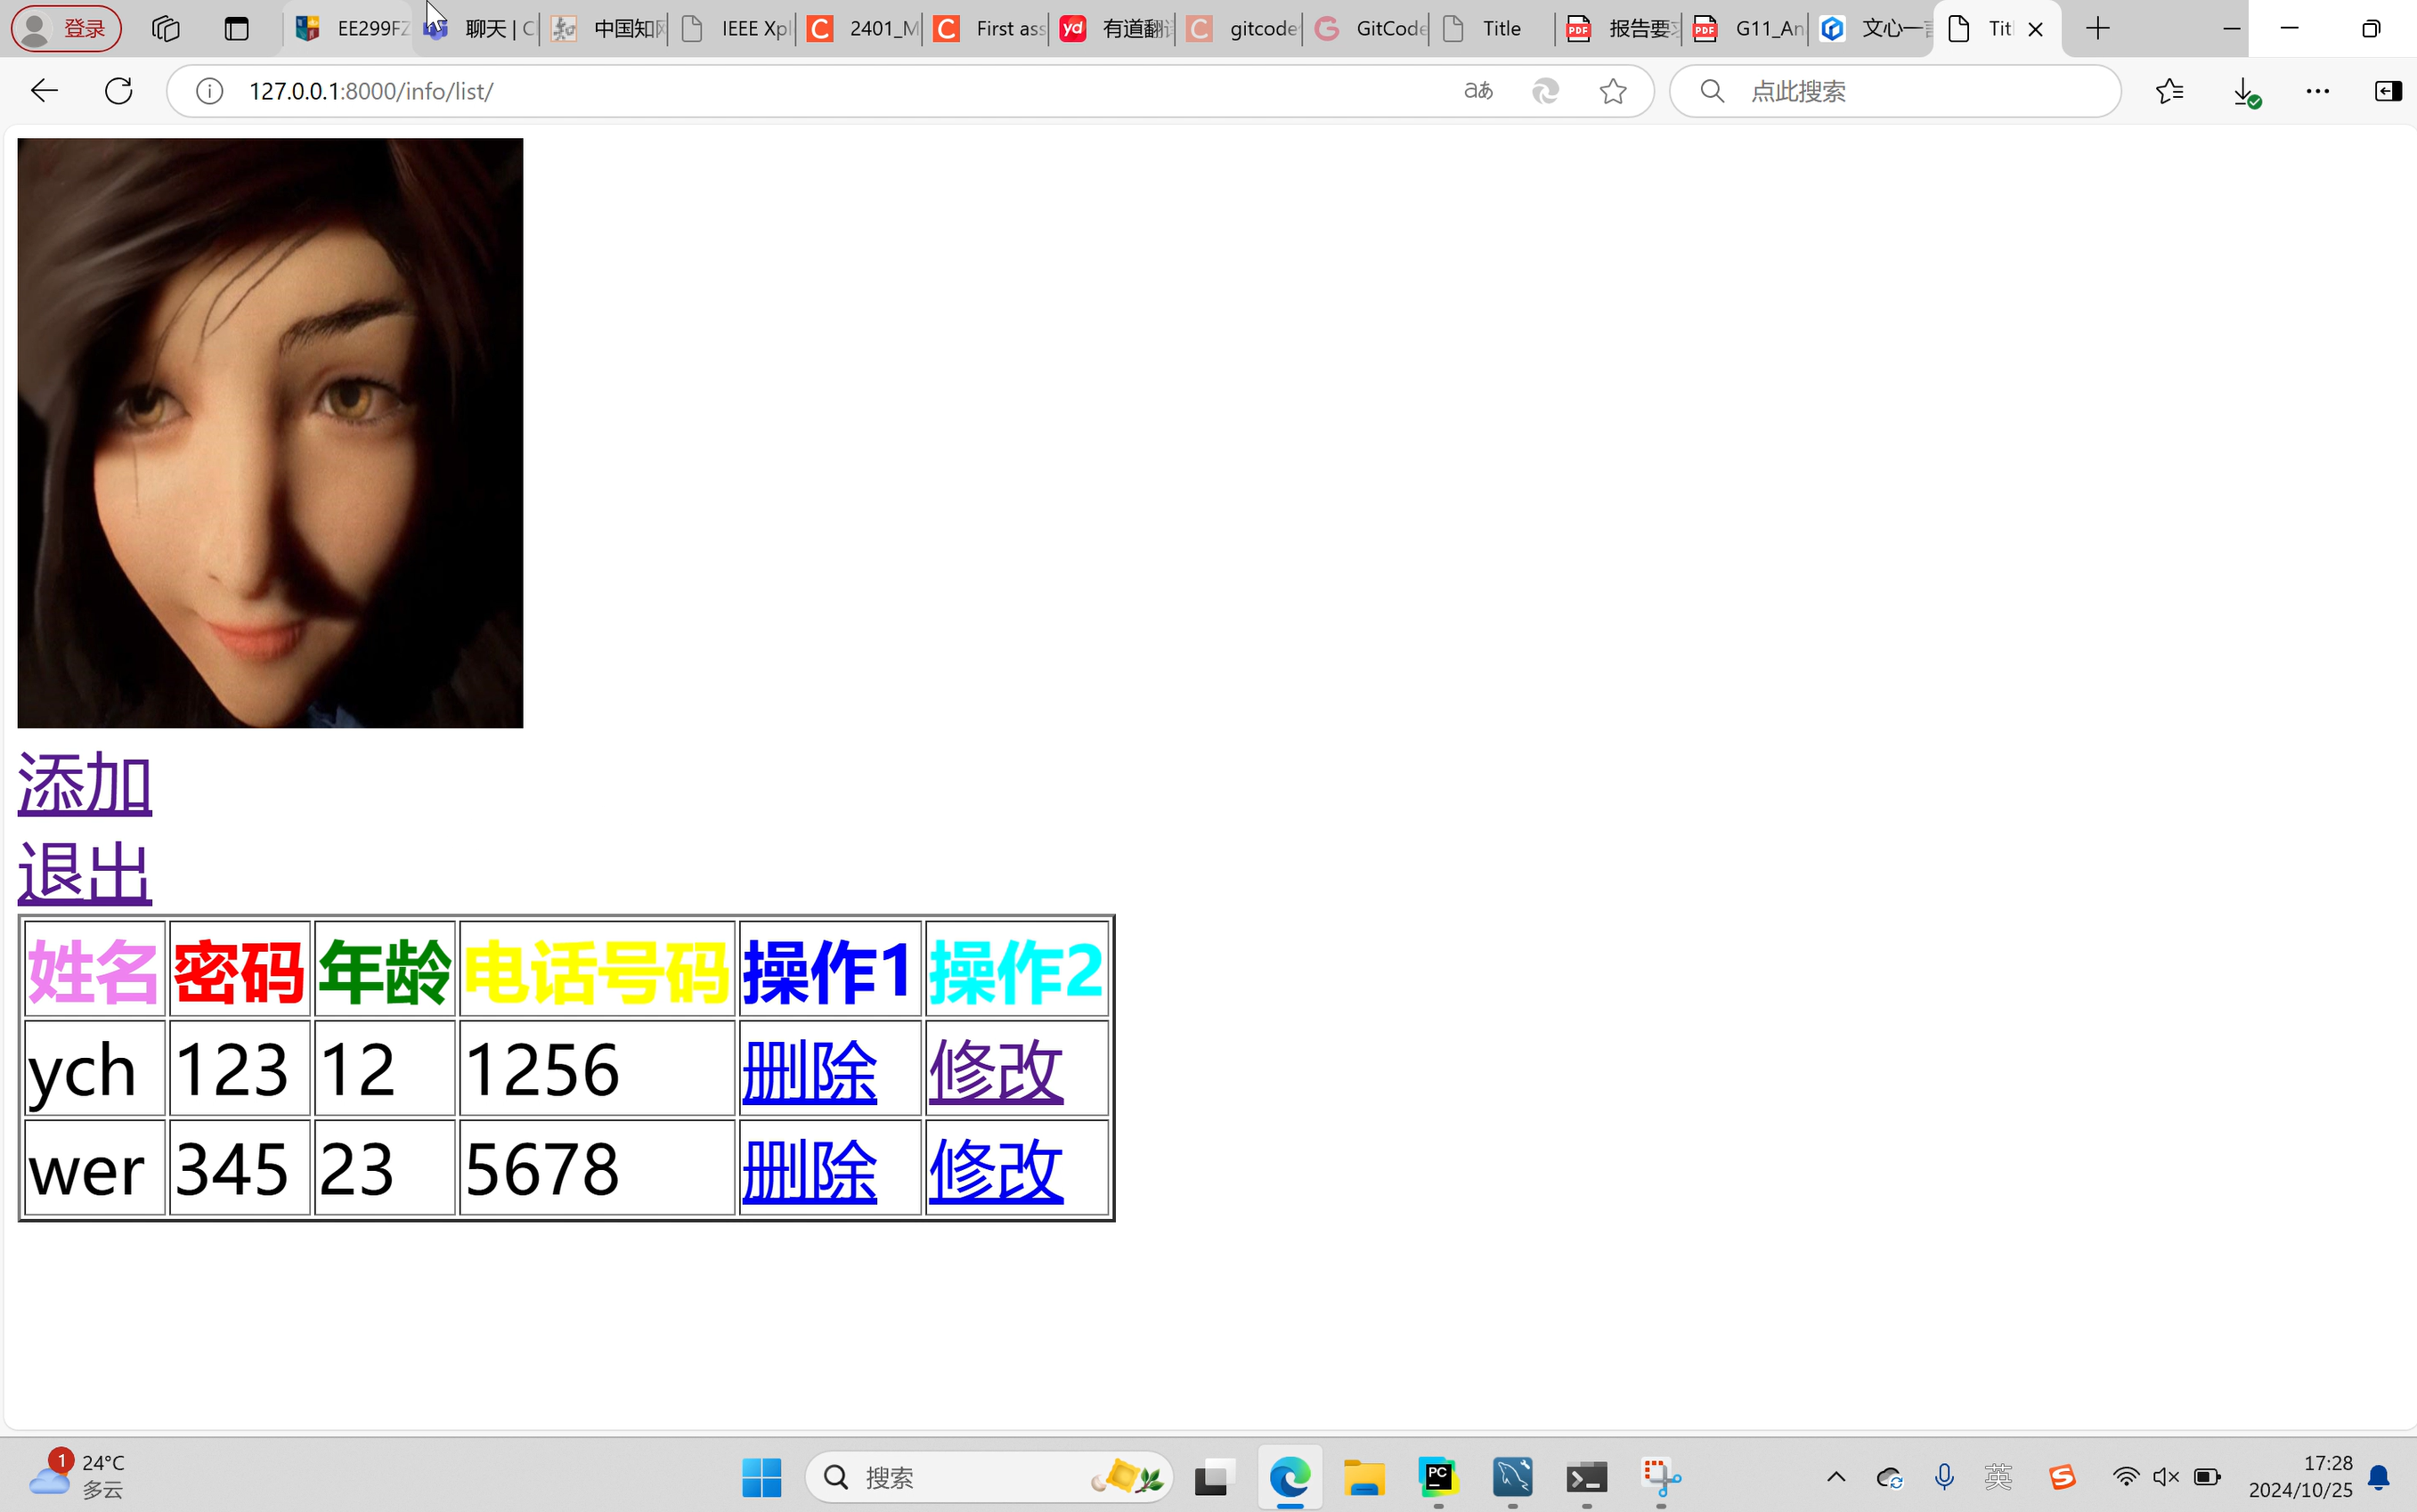


The result of the project is a simple address book called YouShiTongXunLu. You can use this address book to record your name, password, age and phone number such as personal information, you can also view, modify and delete your personal information. This address book is simple but beautiful, and the pages of the address book use colorful fonts and insert a lot of warm pictures, which will make you feel very comfortable.
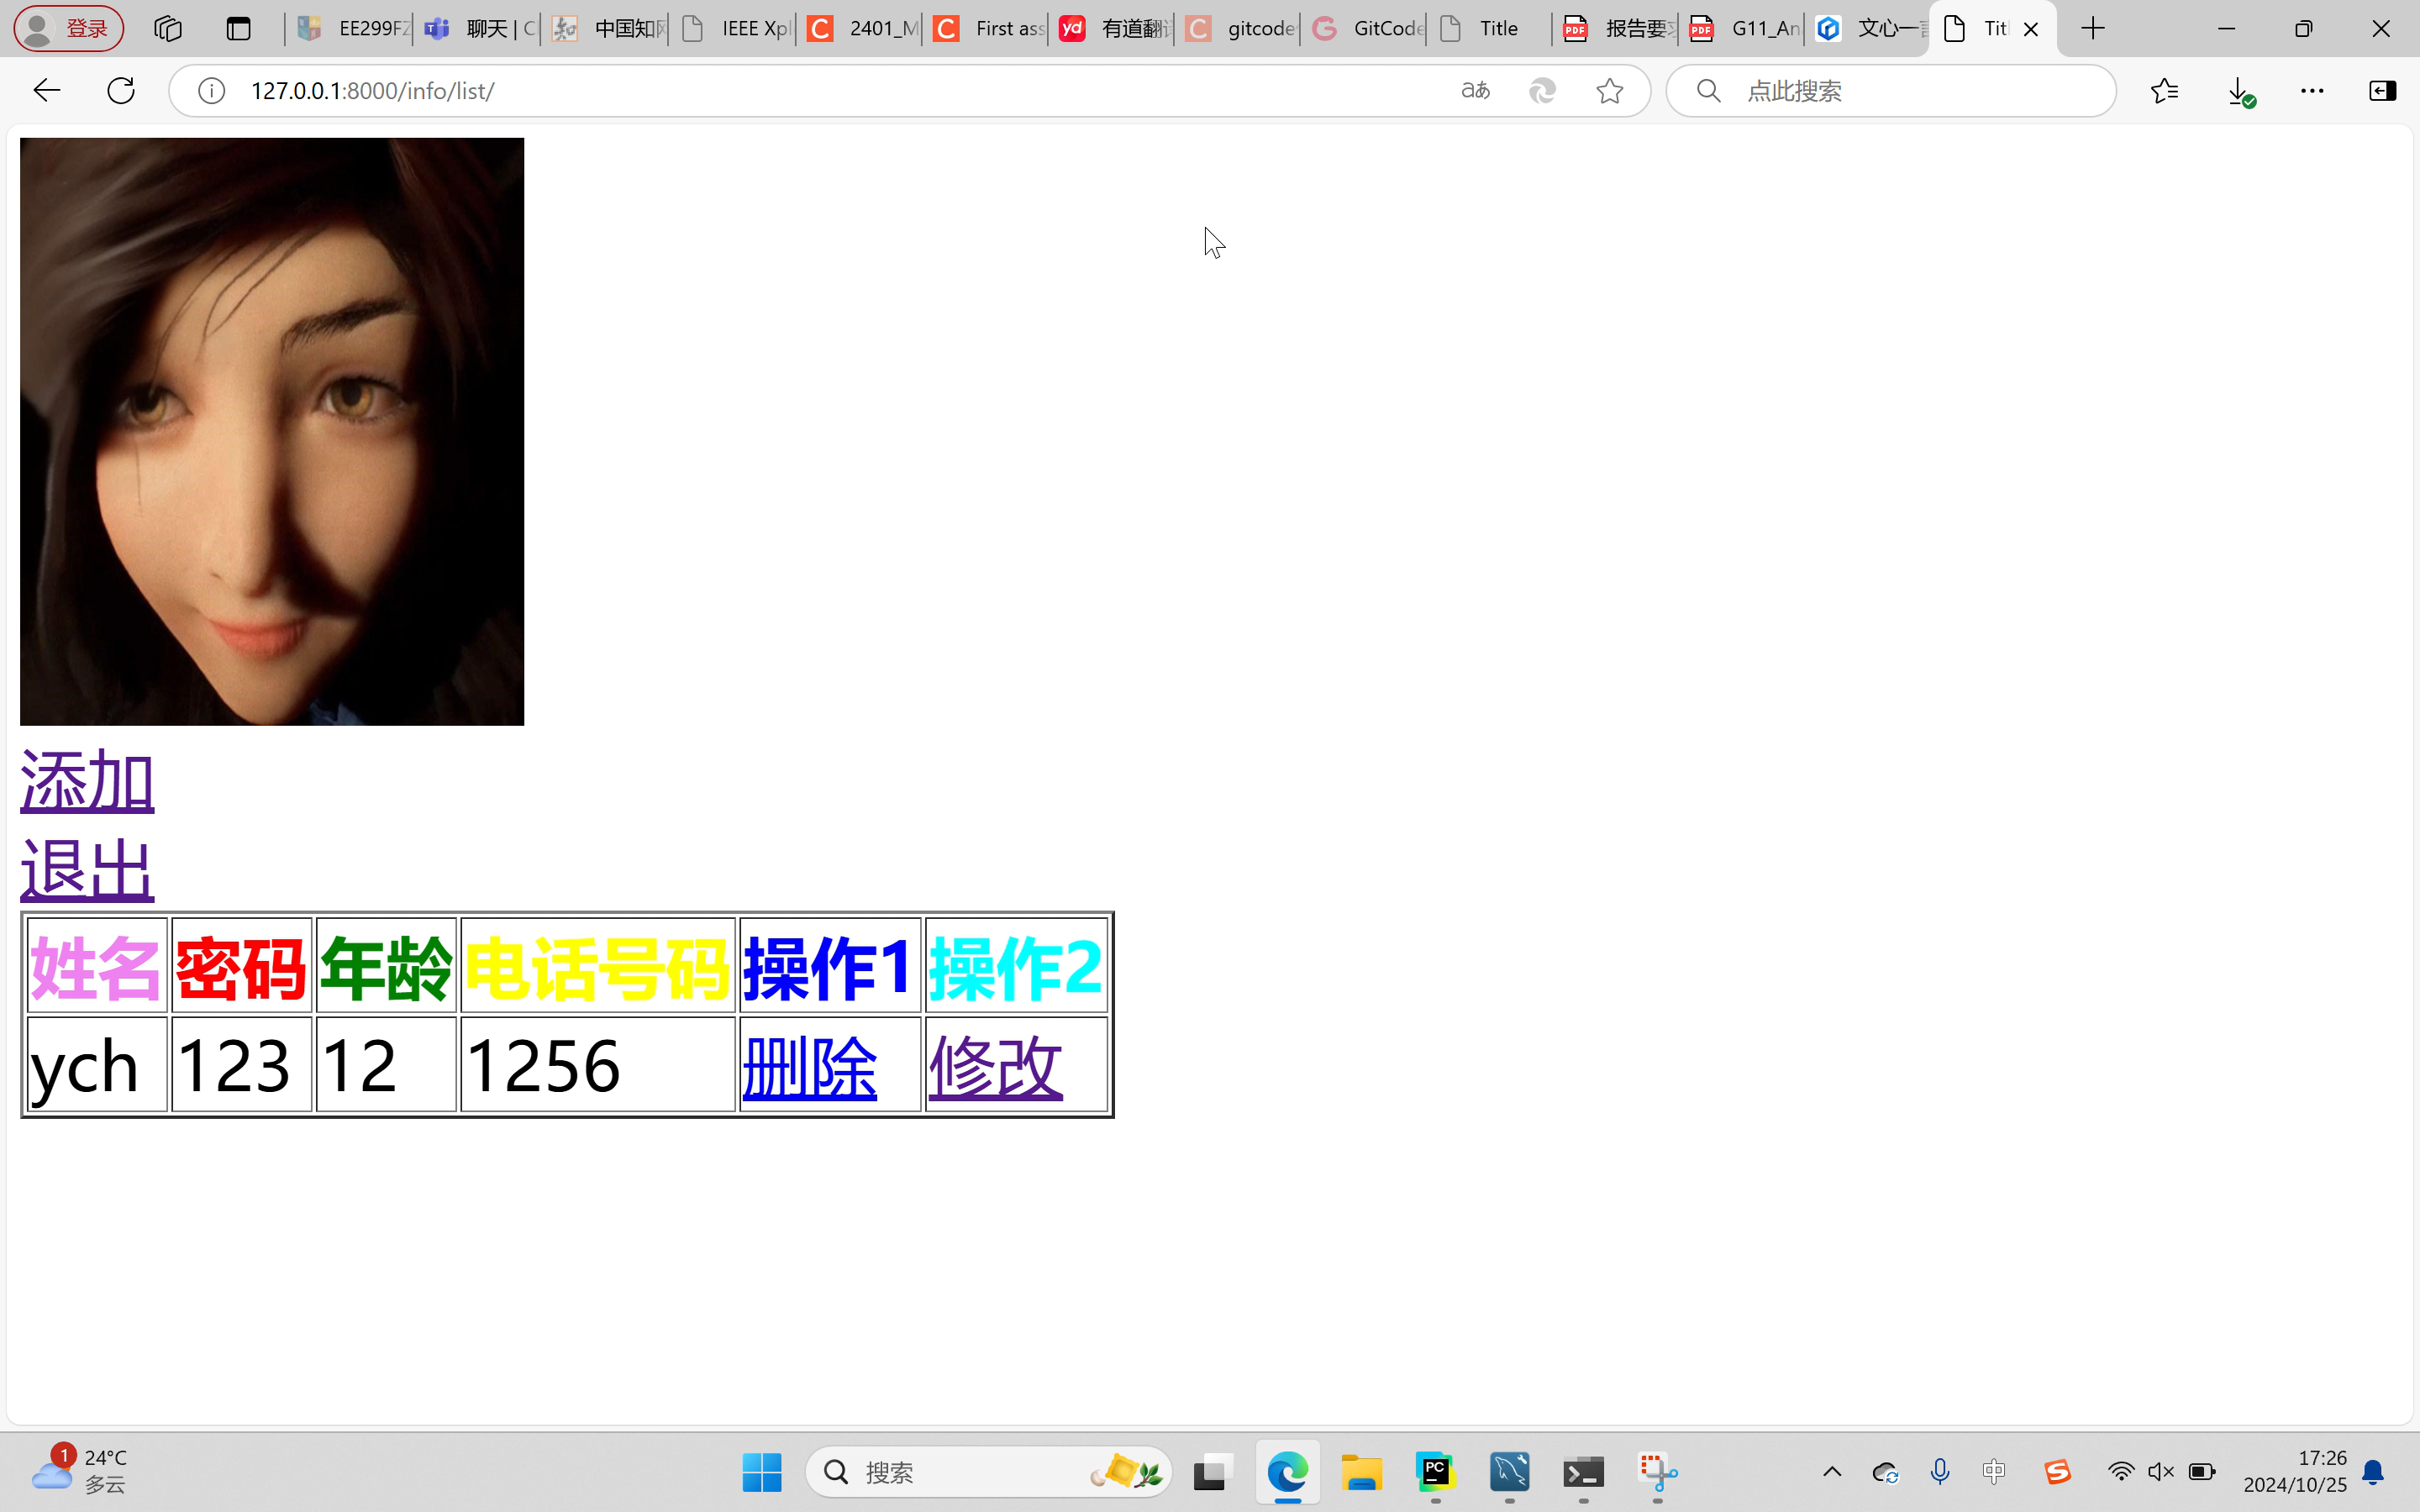
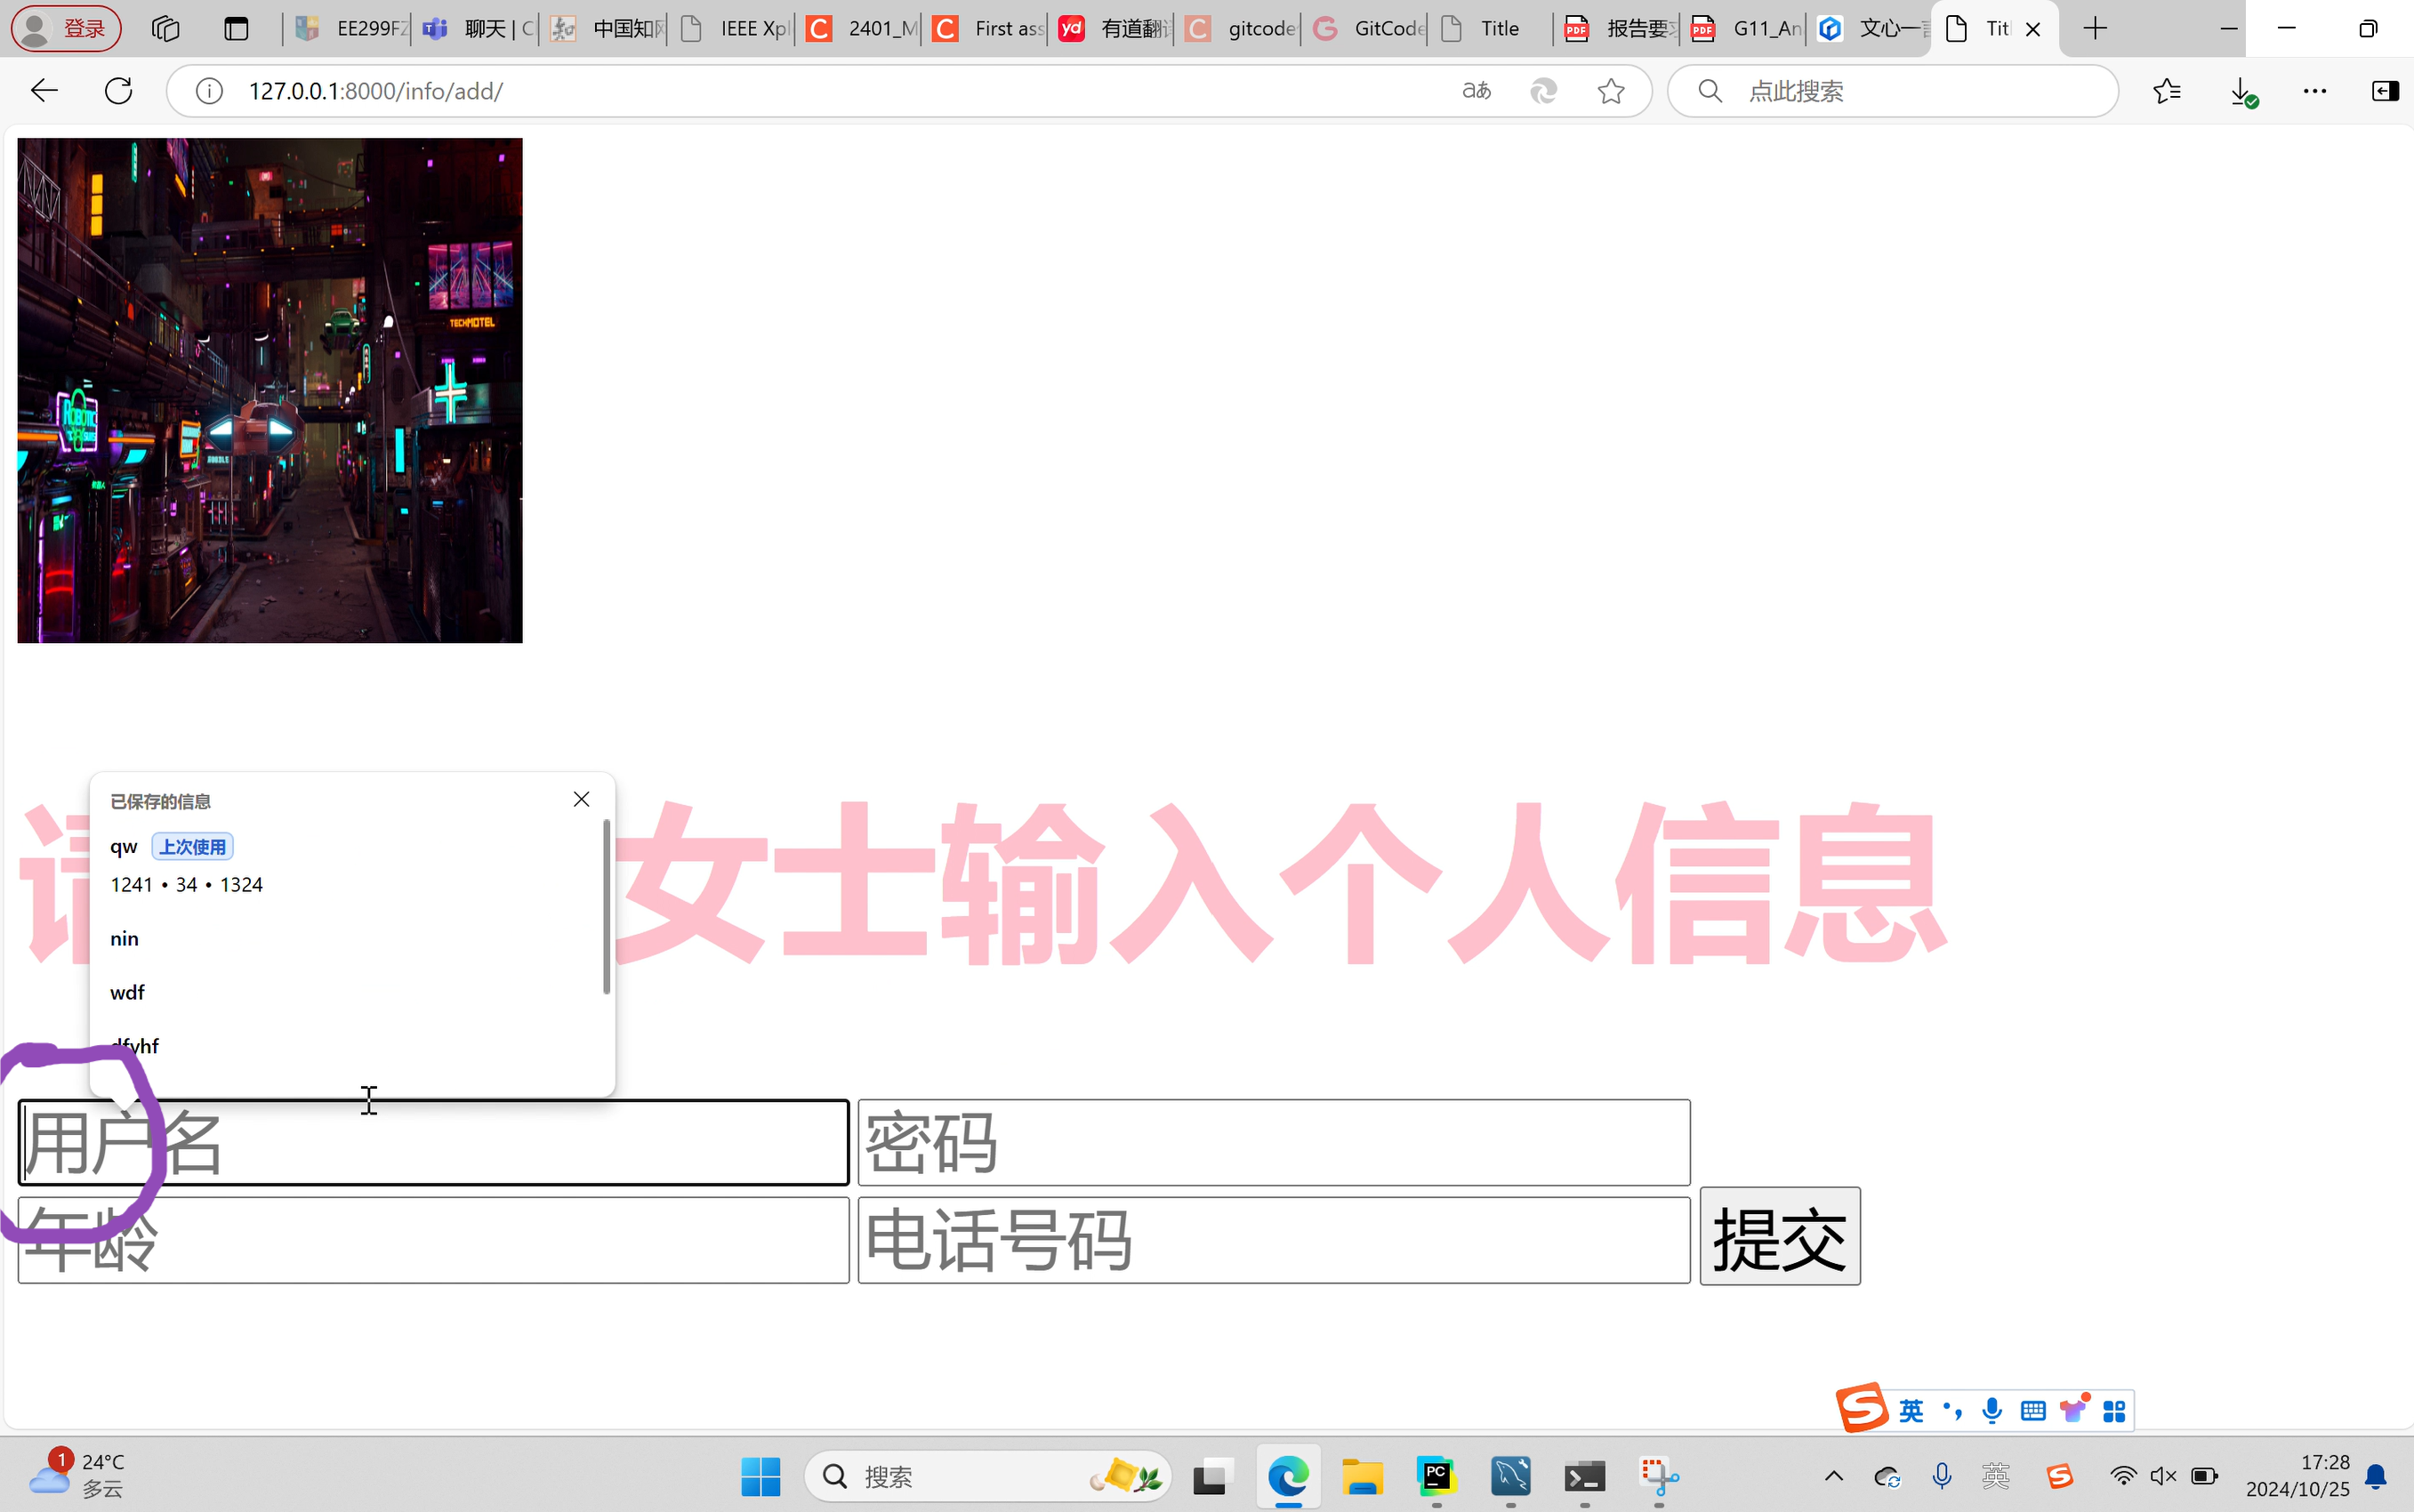
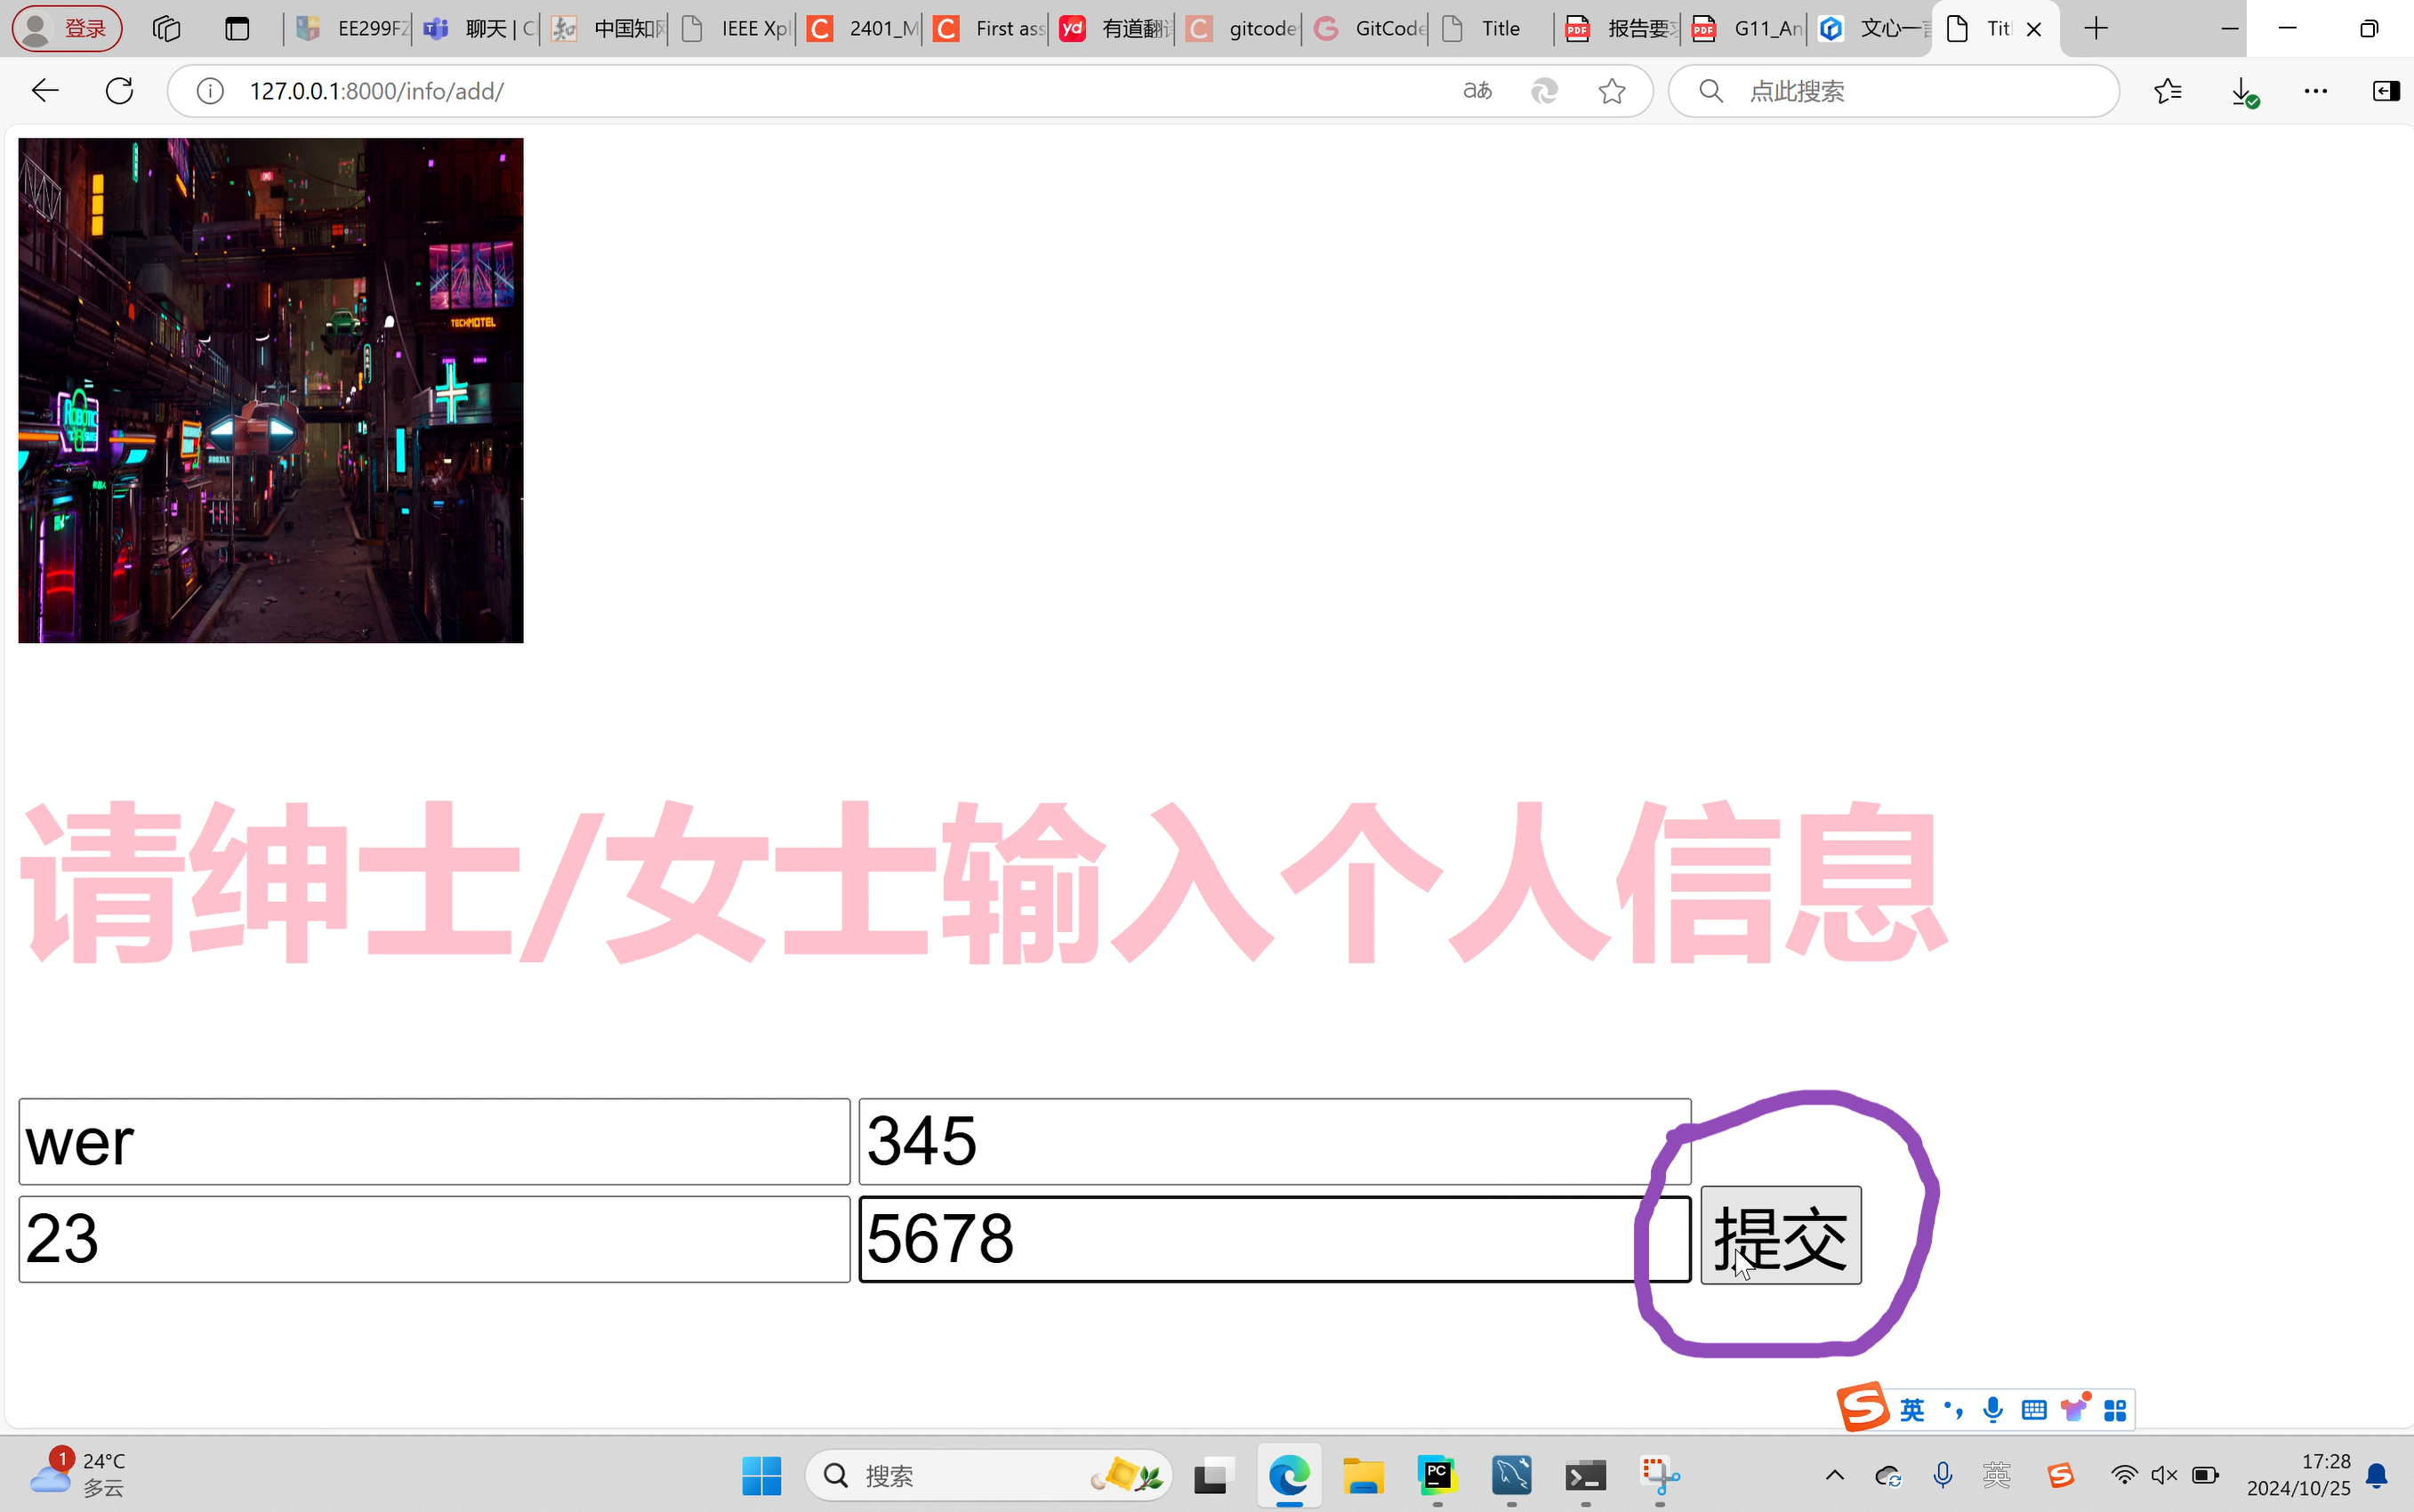
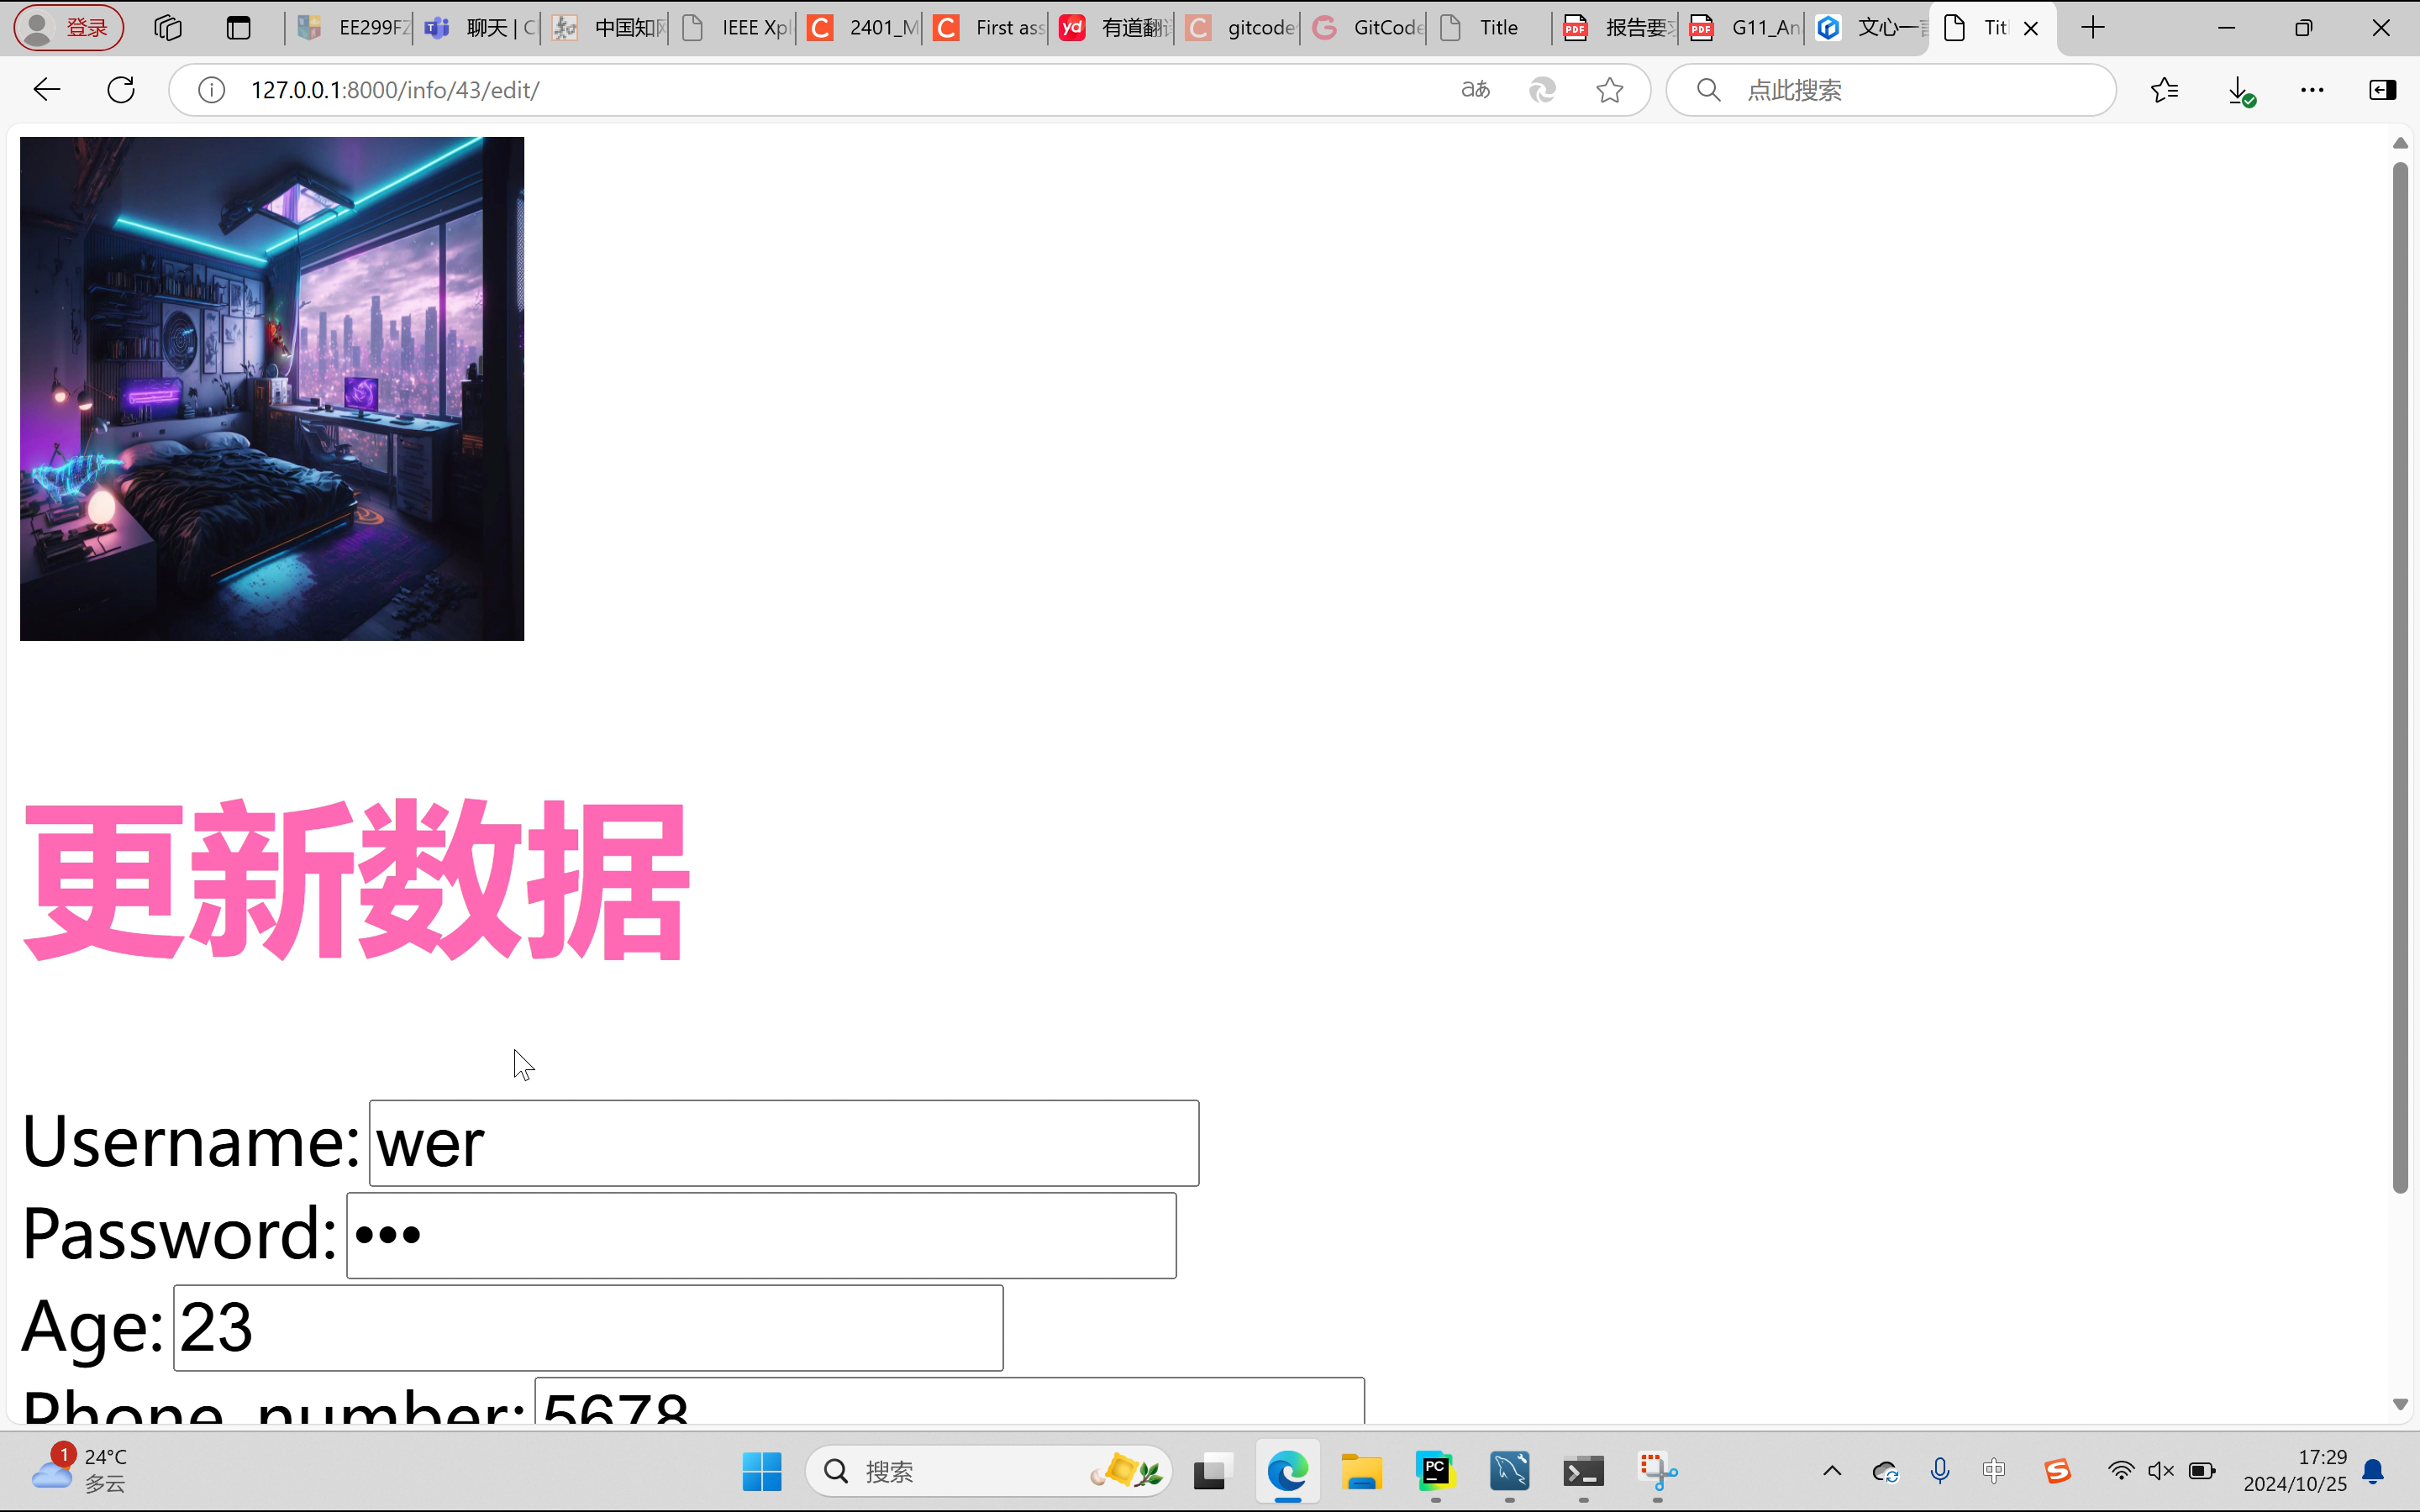
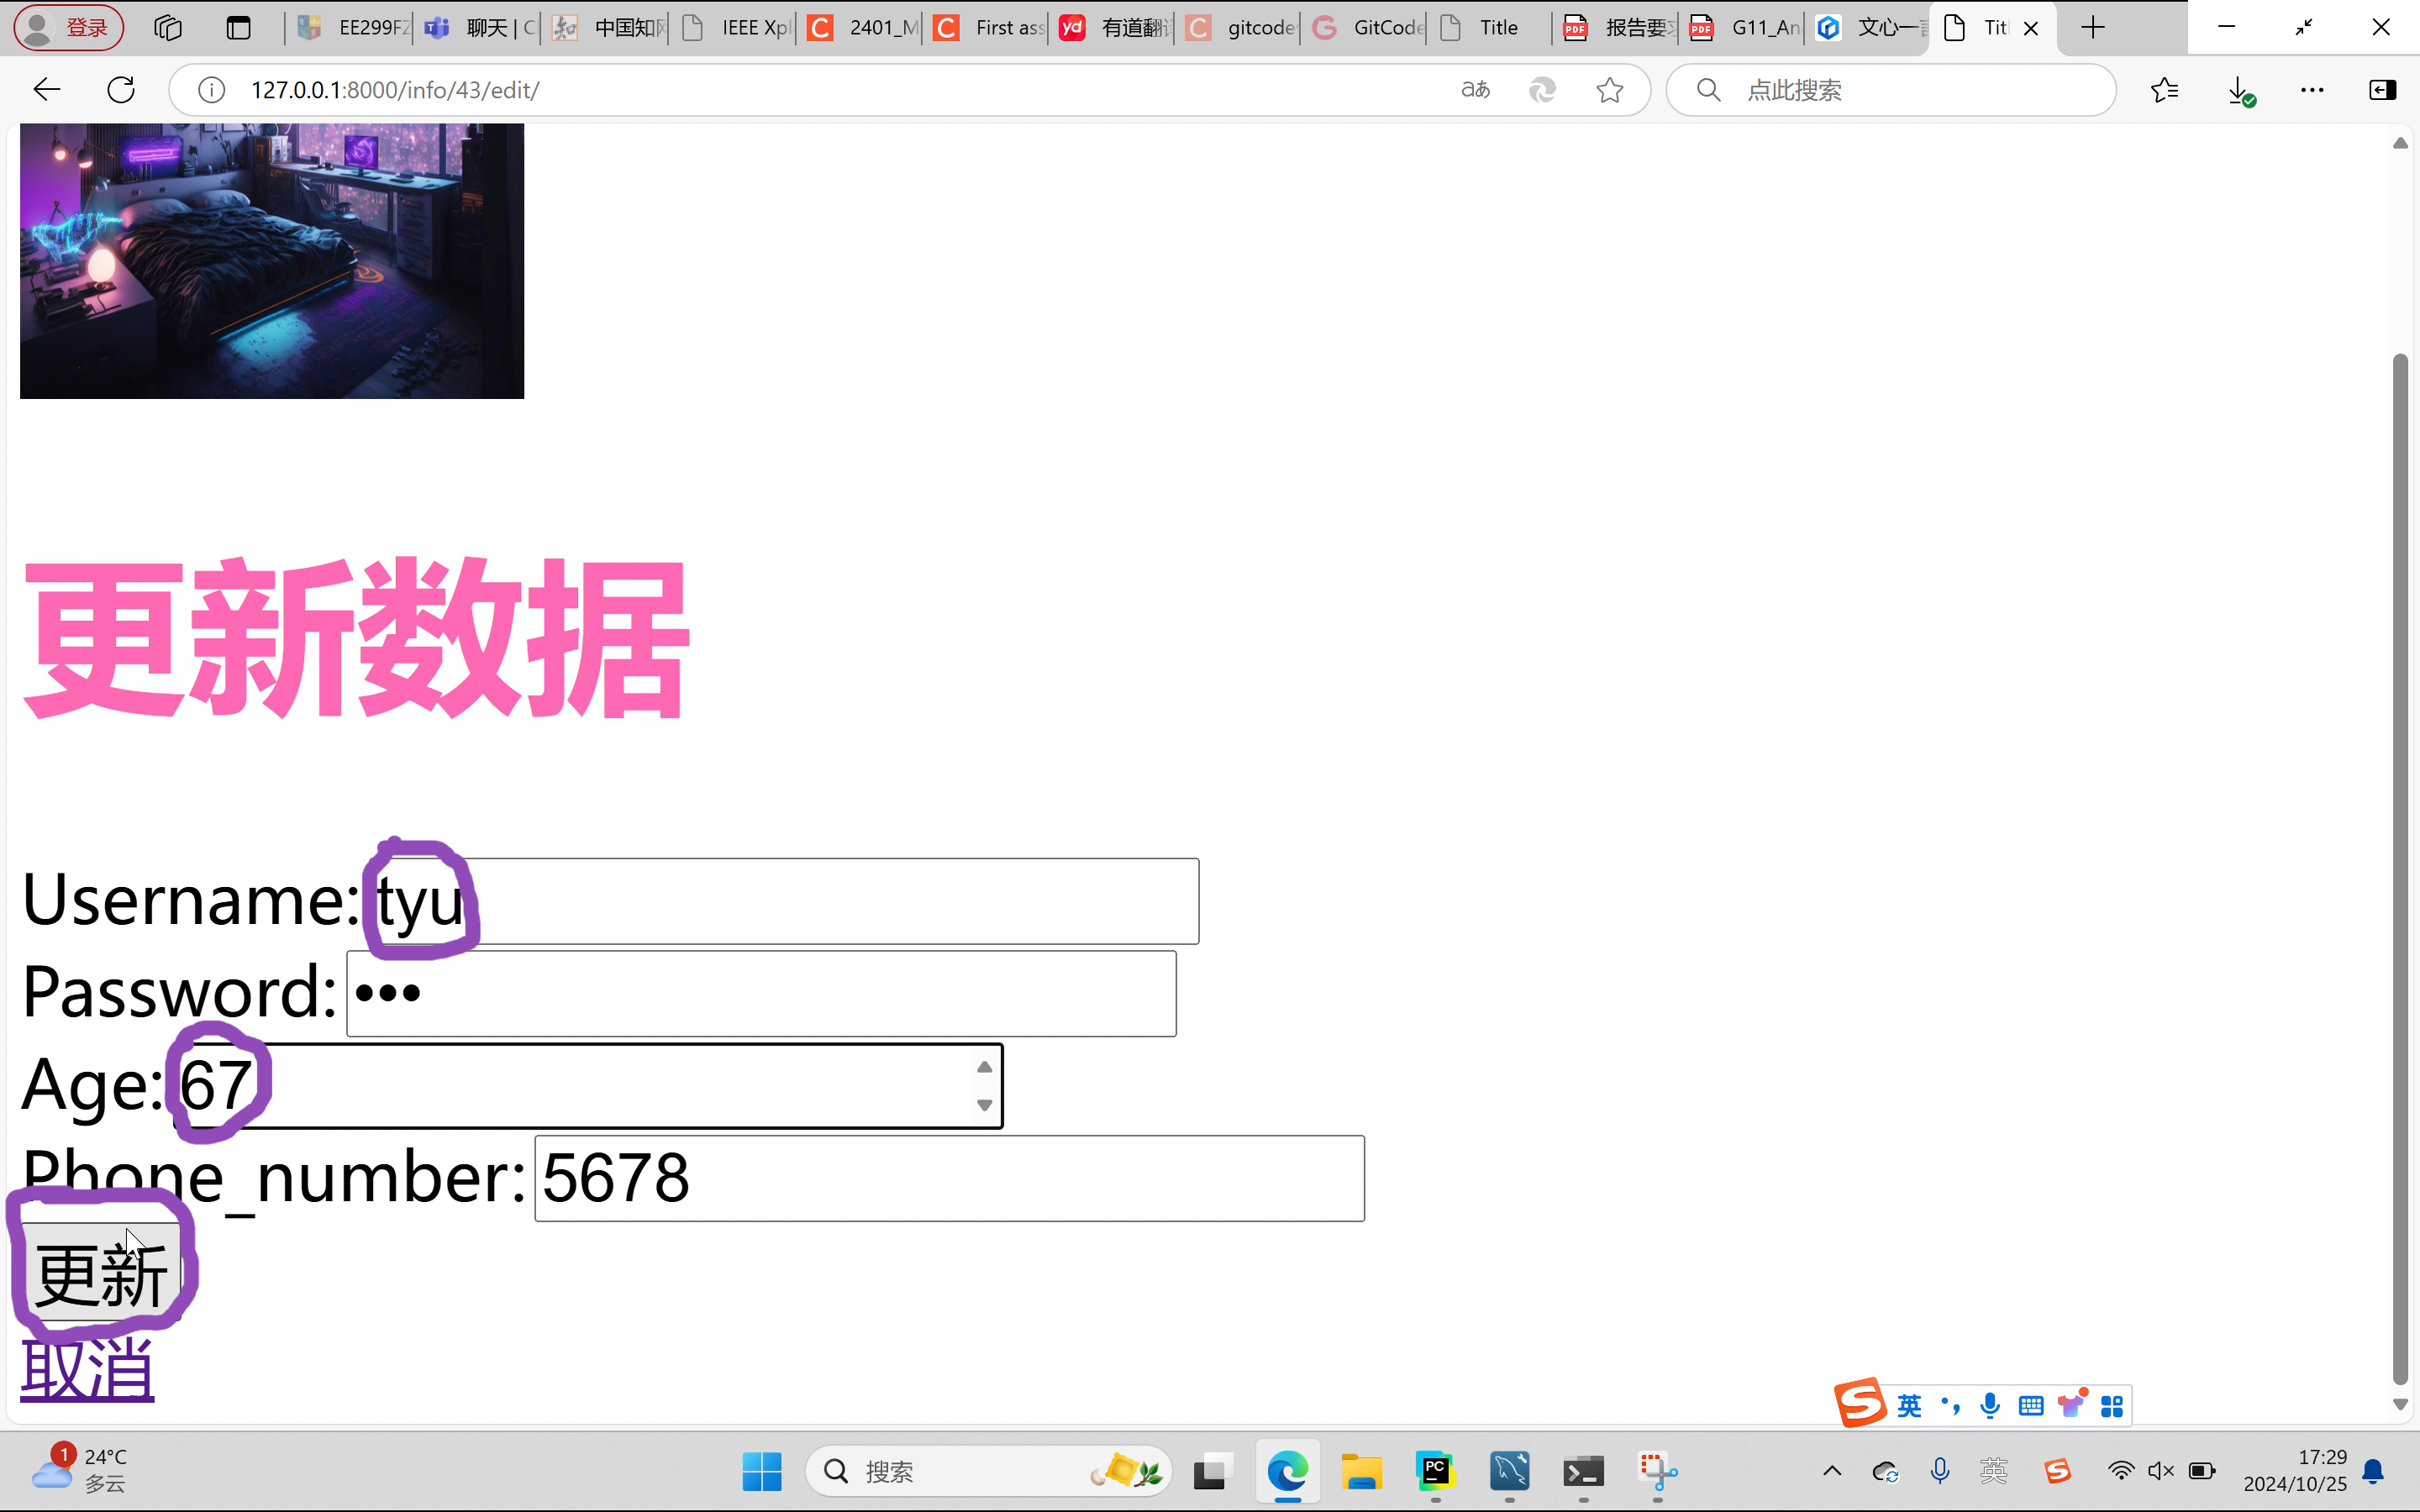
The contact list button is displayed on the start screen. When you click the button, the contact list screen is displayed. The query interface has buttons for add, exit, delete and modify. Click "Add" to enter the add interface, click "Modify" to enter the modify page, click "Delete" to delete data on the current page, click "Exit" to exit the address book. These pages are made up of html,css, input delete and modify data through pycharm's django to connect to the mysql database operation.
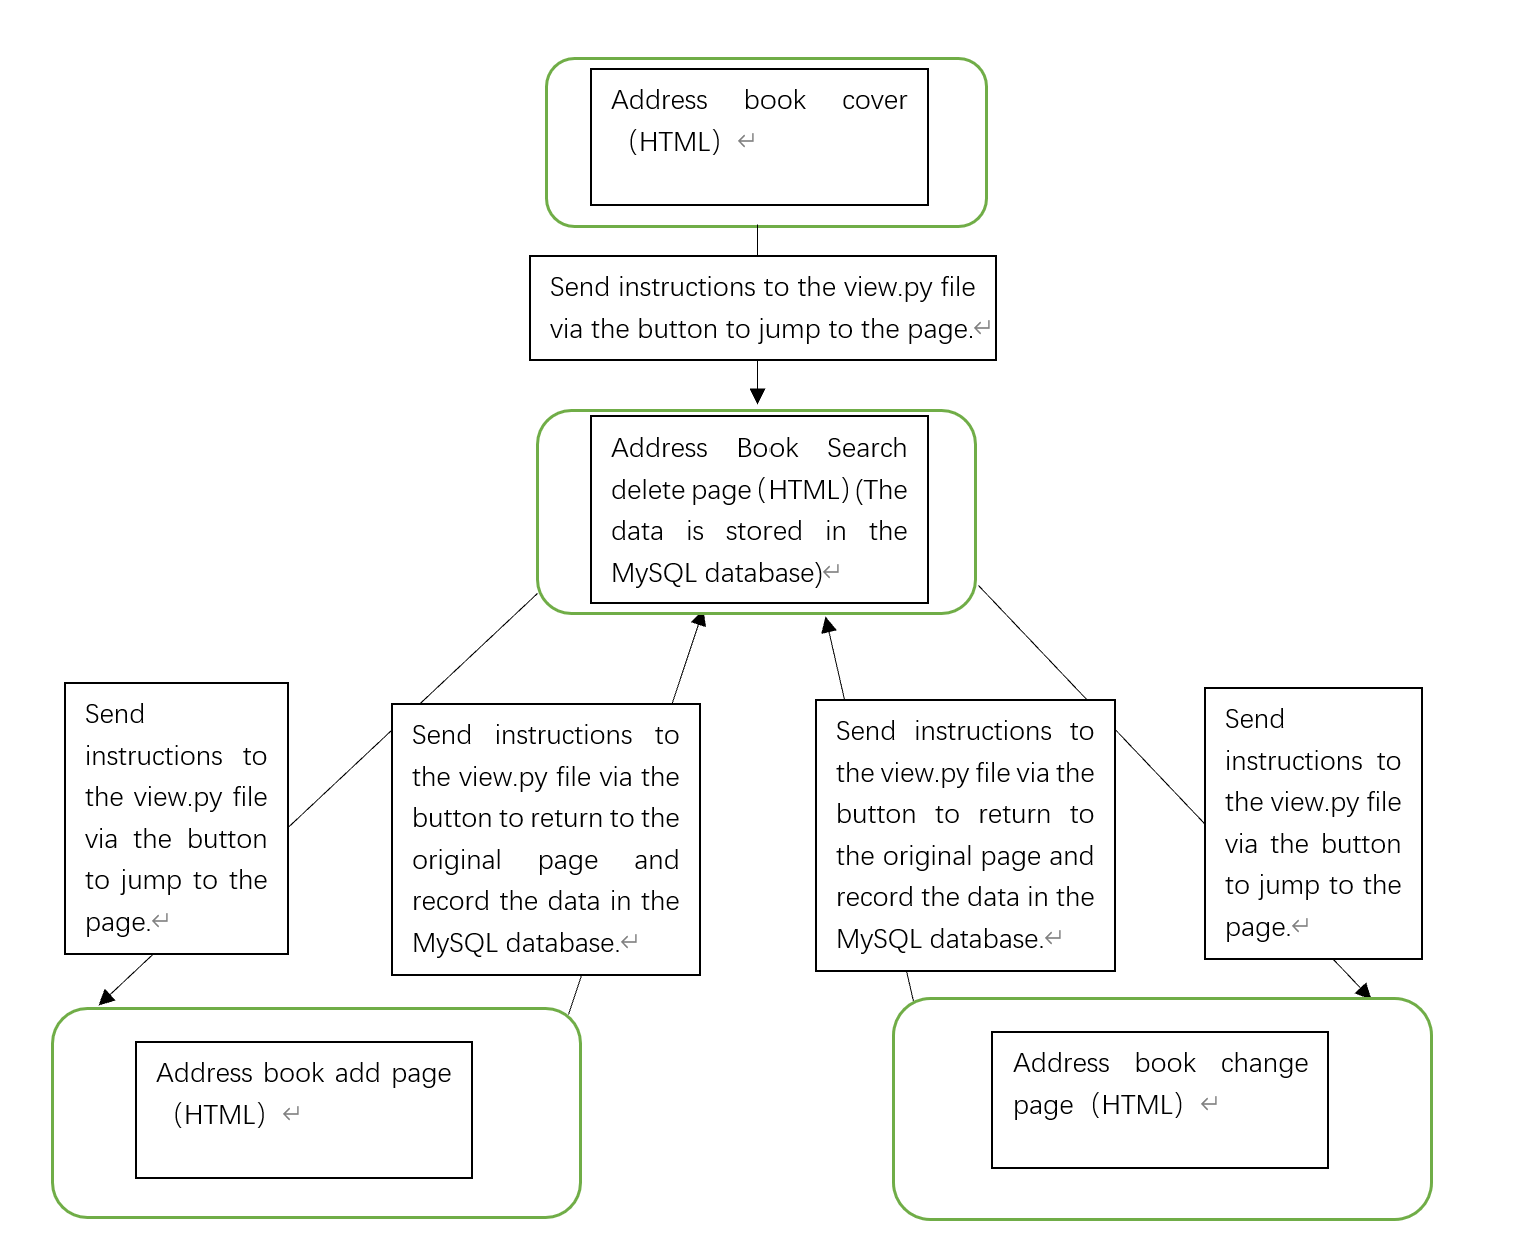
#info_enter.html
<!DOCTYPE html>
<html lang="en">
<head>
    <meta charset="UTF-8">
    <title>Title</title>
</head>
<body>
<h1 style="color: orange;font-size: 60px">尤氏通讯录</h1>
<img src="/static/img/进.jpg"  width="300" height="400" alt="">
<br>
#设置进入按钮
<a style="font-size:40px" href="http://127.0.0.1:8000/info/list/">进入通讯录</a>
</body>
</html>

#info_list.html
<!DOCTYPE html>
<html lang="en">
<head>
    <meta charset="UTF-8">
    <title>Title</title>
</head>
<body>
<img src="/static/img/列.jpg" width="300" height="350" alt="">
<br>
#设置添加按钮
<a style="font-size: 40px" href="http://127.0.0.1:8000/info/add/">添加</a>
<br>
#设置退出按钮
<a style="font-size: 40px" href="http://127.0.0.1:8000/info/enter/">退出</a>
<table border="2">
    <thead>
#设置表格
    <tr>

        <th style="color: violet;font-size:40px">姓名</th>
        <th style="color: red;font-size: 40px">密码</th>
        <th style="color: green;font-size: 40px">年龄</th>
        <th style="color: yellow;font-size: 40px">电话号码</th>
        <th style="color: blue;font-size: 40px">操作1</th>
        <th style="color: aqua;font-size: 40px">操作2</th>
    </tr>
    </thead>
    <tbody>
    {% for obj in data_list %}
#插入数据
    <tr>

         <td style="font-size: 40px">{{obj.name}}</td>
         <td style="font-size: 40px">{{obj.password}}</td>
         <td style="font-size: 40px">{{obj.age}}</td>
         <td style="font-size: 40px">{{obj.phone_number}}</td>
         <td style="font-size: 40px">
             <a href="http://127.0.0.1:8000/info/delete/?nid={{ obj.id }}">删除</a>
         </td>
         <td style="font-size: 40px">
             <a href="http://127.0.0.1:8000/info/{{ obj.id }}/edit/">修改</a>
         </td>
    </tr>
    {% endfor %}
    </tbody>
</table>
</body>
</html>

#info_add.html
<!DOCTYPE html>
<html lang="en">
<head>
    <meta charset="UTF-8">
    <title>Title</title>
</head>
<body>
<img src="/static/img/加.jpeg" width="300" height="300" alt="">
<h1 style="color: pink;font-size: 100px">请绅士/女士输入个人信息</h1>
<form  method="post" action="/info/add/">
#设置输入页面并记录数据
    {% csrf_token %}
<input style="font-size: 40px" type="text" name="user" placeholder="用户名">
<input style="font-size: 40px" type="text" name="pwd" placeholder="密码">
<input style="font-size: 40px" type="text" name="age" placeholder="年龄">
    <input style="font-size: 40px" type="text" name="phone_number" placeholder="电话号码">
#设置提交按钮
<input style="font-size: 40px" type="submit" value="提交">
</form>
</body>
</html>

#info_edit.html
<!DOCTYPE html>
<html lang="en">
<head>
    <meta charset="UTF-8">
    <title>Title</title>
</head>
<body>
<img src="/static/img/改.jpg" width="300" height="300" alt="">
    <h1 style="color: hotpink;font-size: 100px">更新数据</h1>
    <form method="post">
#设置修改页面并记录数据
        {% csrf_token %}
        <label style="font-size: 40px" for="user">Username:</label>
        <input style="font-size: 40px" type="text" id="user" name="user" value="{{ user_info.name }}">
        <br>
        <label style="font-size: 40px" for="pwd">Password:</label>
        <input style="font-size: 40px" type="password" id="pwd" name="pwd" value="{{ user_info.password }}">
        <br>
        <label style="font-size: 40px" for="age">Age:</label>
        <input style="font-size: 40px" type="number" id="age" name="age" value="{{ user_info.age }}">
        <br>
        <label style="font-size: 40px" for="phone_number">Phone_number:</label>
        <input style="font-size: 40px" type="number" id="phone_number" name="phone_number" value="{{ user_info.phone_number}}">
        <br>
#设置更新按钮
        <button style="font-size:40px " type="submit">更新</button>
    </form>
#设置取消按钮
    <a style="font-size: 40px" href="http://127.0.0.1:8000/info/list/">取消</a>
</body>
</html>
#models.py
from email.policy import default
from venv import create
#设置输入类型字节
from django.db import models
class UserInfo(models.Model):
    name = models.CharField(max_length=32)
    password = models.CharField(max_length=32)
    age = models.IntegerField(max_length=32)
    phone_number = models.IntegerField(max_length=32)
"""
create table app2_userinfo(
    id bigint auto_increment primary key,
    name varchar(32),
    password varchar(64),
    age int
)
"""
class Department(models.Model):
    title = models.CharField(max_length=32)


#settings.py
"""
Django settings for djangoProject2 project.

Generated by 'django-admin startproject' using Django 5.1.2.

For more information on this file, see
https://docs.djangoproject.com/en/5.1/topics/settings/

For the full list of settings and their values, see
https://docs.djangoproject.com/en/5.1/ref/settings/
"""
# Application definition
# ...(其他中间件、模板、数据库等设置保持不变)
# 静态文件(CSS、JavaScript、Images)
# 注意:这里不需要再次设置 STATIC_URL,因为它已经在上面设置过了
# 如果您在生产环境中遇到问题,请确保已经运行了 `python manage.py collectstatic`
# 并且您的Web服务器(如Nginx、Apache)已正确配置为服务STATIC_ROOT目录中的文件
import os
from pathlib import Path
BASE_DIR = Path(__file__).resolve().parent.parent
# 静态文件目录设置
STATIC_URL = '/static/'  # 静态文件的URL前缀
STATICFILES_DIRS = [
    os.path.join(BASE_DIR, 'static'),  # 您的静态文件应该放在这个目录下
]
STATIC_ROOT = os.path.join(BASE_DIR, 'staticfiles')
# Quick-start development settings - unsuitable for production
# See https://docs.djangoproject.com/en/5.1/howto/deployment/checklist/
# SECURITY WARNING: keep the secret key used in production secret!
SECRET_KEY = 'django-insecure-qnz!91!+1yznag^zk&_7%vmzh-mtel1v*#4i6v8m&t+5^s#&7_'
# SECURITY WARNING: don't run with debug turned on in production!
DEBUG = True
ALLOWED_HOSTS = []
# Application definition
#注册app2
INSTALLED_APPS = [
    'django.contrib.admin',
    'django.contrib.auth',
    'django.contrib.contenttypes',
    'django.contrib.sessions',
    'django.contrib.messages',
    'django.contrib.staticfiles',
    'app2.apps.App2Config',
]
MIDDLEWARE = [
    'django.middleware.security.SecurityMiddleware',
    'django.contrib.sessions.middleware.SessionMiddleware',
    'django.middleware.common.CommonMiddleware',
    'django.middleware.csrf.CsrfViewMiddleware',
    'django.contrib.auth.middleware.AuthenticationMiddleware',
    'django.contrib.messages.middleware.MessageMiddleware',
    'django.middleware.clickjacking.XFrameOptionsMiddleware',
]

ROOT_URLCONF = 'djangoProject2.urls'
TEMPLATES = [
    {
        'BACKEND': 'django.template.backends.django.DjangoTemplates',
        'DIRS': [BASE_DIR / 'templates']
        ,
        'APP_DIRS': True,
        'OPTIONS': {
            'context_processors': [
                'django.template.context_processors.debug',
                'django.template.context_processors.request',
                'django.contrib.auth.context_processors.auth',
                'django.contrib.messages.context_processors.messages',
            ],
        },
    },
]
WSGI_APPLICATION = 'djangoProject2.wsgi.application'
# Database
# https://docs.djangoproject.com/en/5.1/ref/settings/#databases
DATABASES = {
    'default': {
        'ENGINE': 'django.db.backends.mysql',
        'NAME': 'tongxun',
        'USER':'root',
        'PASSWORD':'ych2003112307',
        'HOST':'127.0.0.1',
        'PORT':3306,

    }
}
# Password validation
# https://docs.djangoproject.com/en/5.1/ref/settings/#auth-password-validators
AUTH_PASSWORD_VALIDATORS = [
    {
        'NAME': 'django.contrib.auth.password_validation.UserAttributeSimilarityValidator',
    },
    {
        'NAME': 'django.contrib.auth.password_validation.MinimumLengthValidator',
    },
    {
        'NAME': 'django.contrib.auth.password_validation.CommonPasswordValidator',
    },
    {
        'NAME': 'django.contrib.auth.password_validation.NumericPasswordValidator',
    },
]
# Internationalization
# https://docs.djangoproject.com/en/5.1/topics/i18n/
LANGUAGE_CODE = 'en-us'
TIME_ZONE = 'UTC'
USE_I18N = True
USE_TZ = True
# Static files (CSS, JavaScript, Images)
# https://docs.djangoproject.com/en/5.1/howto/static-files/
STATIC_URL = 'static/'
# Default primary key field type
# https://docs.djangoproject.com/en/5.1/ref/settings/#default-auto-field
DEFAULT_AUTO_FIELD = 'django.db.models.BigAutoField'


#urls.py
"""
URL configuration for djangoProject2 project.
The `urlpatterns` list routes URLs to views. For more information please see:
    https://docs.djangoproject.com/en/5.1/topics/http/urls/
Examples:
Function views
    1. Add an import:  from my_app import views
    2. Add a URL to urlpatterns:  path('', views.home, name='home')
Class-based views
    1. Add an import:  from other_app.views import Home
    2. Add a URL to urlpatterns:  path('', Home.as_view(), name='home')
Including another URLconf
    1. Import the include() function: from django.urls import include, path
    2. Add a URL to urlpatterns:  path('blog/', include('blog.urls'))
"""
# urls.py
# 从 django.urls 模块导入 path 函数
from django.urls import path
# 从 app2 模块导入 views(假设 views.py 文件中有 hello 视图函数)
from app2 import views
# 定义 URLconf
urlpatterns = [
    # 使用 path 函数定义一个路由
    path('user/list/', views.user_list),
    path('user/add/', views.user_add),
    path('login/',views.login),
#设置视图函数路径
    path('orm/',views.orm),
    path('info/list/', views.info_list),
    path('info/add/', views.info_add),
    path('info/delete/', views.info_delete),
    path('info/<int:nid>/edit/', views.info_edit),
    path('info/enter/', views.info_enter),
]


#views.py
from django.http import HttpResponse
from .models import UserInfo
from django.shortcuts import render
from django.shortcuts import redirect
from app2.models import Department,UserInfo
def user_list(request): ...
def user_add(request): ...
def login(request):
    if request.method == "GET":
        return render(request, "login.html")
    else:
        username = request.POST.get('user')
        password = request.POST.get('pwd')
        if username == 'root' and password == '123':
            return HttpResponse("登录成功")
        else:
            return render(request,"login.html",{"error_msg":"用户名或密码错误"})
#先前调试
def orm(request):
    UserInfo.objects.create(name='吴艳君',password='666',age='55',phone_number='5678')
    return HttpResponse('成功')
#将数据库中存储的数据导入查询页面
def info_list(request):
    data_list=UserInfo.objects.all()
    return  render(request,"info_list.html",{'data_list':data_list})
#将得到的数据记录在数据库
def info_add(request):
    if request.method == "GET":
        return  render(request,'info_add.html')

    user = request.POST.get("user")
    pwd = request.POST.get("pwd")
    age = request.POST.get("age")
    phone_number = request.POST.get("phone_number")
    UserInfo.objects.create(name=user,password=pwd,age=age,phone_number=phone_number)
#输入数据后自动跳转回原页面
    return redirect("http://127.0.0.1:8000/info/list/")
#删除数据并在数据库记录当前数据
def info_delete(request):
    nid = request.GET.get('nid')
    UserInfo.objects.filter(id=nid).delete()
#删除数据后跳转回原页面
    return redirect("http://127.0.0.1:8000/info/list/")
#修改数据并在数据库记录当前数据
def info_edit(request,nid):
    if request.method == "GET":
        user_info = UserInfo.objects.filter(id=nid).first()
        return render(request, 'info_edit.html', {'user_info': user_info})

    user = request.POST.get("user")
    pwd = request.POST.get("pwd")
    age = request.POST.get("age")
    phone_number = request.POST.get("phone_number")
    UserInfo.objects.filter(id=nid).update(name=user, password=pwd, age=age,phone_number=phone_number)
#修改数据后跳转回原页面
    return redirect("http://127.0.0.1:8000/info/list/")
def info_enter(request):
    return render(request,"info_enter.html")
Through the study and practice of front-end and back-end development, I have learned the basic steps of web page construction and can make simple information interaction programs, which will provide great help for my future work.
